.png)
.svg)


SUPERMOUNTS
Camera & Track Tools
How to Mount a DSLR or Mirrorless Camera in Your Car
March 20, 2025
.jpg)
Introduction — Filming with a “Big” Camera in a Car
More and more car enthusiasts are capturing their driving exploits to improve their behind-the-wheel skills and relive fond memories. Meanwhile, content creators take the same steps to expand and entertain their audiences. While GoPros and similar action cameras have become the standard devices for these activities, they can fall short, particularly for those looking to record higher-quality images and footage. In these cases, a DSLR or mirrorless camera becomes compelling.
Why use a DSLR/mirrorless for in-car footage
Using a DSLR car mount setup offers several advantages over smaller action cameras:
- Enhanced image quality due to larger sensors
- Superior low-light performance
- Improved depth-of-field control for greater cinematic effects
- Availability of interchangeable lenses for alternate shooting styles
- Increased audio functionality when used with high-quality external microphones
- Greater exposure, focus, and white balance management via sophisticated manual controls
The challenge: securing a heavier camera vs. a small action cam
While a modern DSLR is relatively compact, it still presents unique mounting challenges:
- Extra weight can overwhelm some mounting systems
- Stability issues due to a higher center of gravity
- Potential for impaired driver visibility with some mounts
- Damage risk due to potential mounting failure
Learning how to mount a DSLR in a car requires looking beyond what works for a lightweight action camera. The G-forces that occur during performance driving can tax a mounting system that’s designed for a GoPro. Consider this: a lighter GoPro unit weighs 60 to 75 grams (about 2.1 to 2.6 ounces), but a high-end mirrorless camera like a Sony ZV-E10 or Nikon Z5 can weigh 350 to 700 grams (approximately 12.3 to 24.7 ounces) without the lens. DSLRs weigh even more.
Equipment You'll Need
Sturdy car mount capable of supporting DSLR weight
The fundamental element of any effective camera mount in a car setup is a sturdy base system. Your options include:
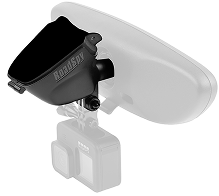
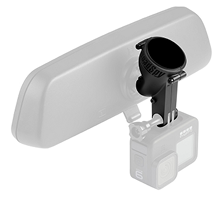
- Mirror-based Mounts: SUPERMOUNTS and similar systems attach to the rearview mirror stem, creating a stable platform without obstructing the driver’s view.
- Clamp System: Heavy-duty clamps secure to an interior roll bar or other fixed point.
Matt Farah of The Smoking Tire calls out SUPERMOUNTS because “It's high and in the center line and takes up so little space on the windshields. You're not blocking your air vents, you don't have some bulky thing.”
Importantly, consider not only the current weight of your camera but also how much accessories and different lenses may add to the total. As mentioned, DSLRs and mirrorless cameras weigh considerably more than most action cameras. So, even robust suction cup mounts can be inadequate, especially during more spirited driving.
Vibration dampeners and safety tethers
Supplementing a secure mounting platform with essential add-ons can improve footage quality and minimize damage risk to expensive equipment:
- Vibration Dampeners: Rubber isolators or specialized dampening systems reduce the micro-vibrations that can impact footage quality.
- Safety Tethers: DSLRs have expensive price tags. To protect this investment, use a backup attachment method like a camera strap secured to a fixed point in the cabin.
- Extreme Protection: For off-road exploits like trail running and hill climbing that might yield unpredictable driving encounters, protect your equipment with a camera cage or add padding to adjacent areas.
Optional: external mic and power solutions for long shooting sessions
Audio quality often takes a back seat to video efforts, but meaningful sound can make all the difference, especially with ASMR-style productions. Meanwhile, non-stop filming ability ensures all the action gets recorded. Here are valuable accessories to consider:
- External Microphone: A shotgun or Lavalier mic can capture impactful sounds (like engine or exhaust noise) that might go unnoticed or be relegated to the background.
- DC Power Adapter: Connecting battery-powered equipment to the car’s electrical system allows unlimited recording time and eliminates the need to swap out empty power cells.
- Larger-Capacity Memory Cards: Extended behind-the-wheel adventures call for a higher-capacity memory card to capture all the activity from start to finish.
- External Monitors: While DSLRs and mirrorless cameras are excellent for expanded coverage, their optical viewfinders or digital displays may not be sufficient to frame shots correctly. An external monitor can ensure nothing is missed.
Step-by-Step Mounting Process
Step 1 — Choose the right mounting point
The first step for film driving with a mirrorless camera setup is identifying the optimal mounting location:
- Assess the vehicle's interior for potential anchor points.
- Determine the ideal camera angle for your needs: driver-targeted, road-focused, or a dashboard view.
- Address driver visibility to avoid a camera setup that causes visibility issues.
- Identify vehicle movement conditions during spirited driving that may impact footage quality.
Mirror-based mounts like SUPERMOUNTS are well-suited for performance driving. As Farah remarks, “It's an easy two-minute installation, and it's totally reversible, so there are no permanent modifications to your car."

Step 2 — Attach the mounting hardware securely
Installation is straightforward for mirror-based systems like SUPERMOUNTS:
- Review the manufacturer’s instructions
- Remove the mirror's covering panel or locate attachment points as applicable
- Secure the mount's base to the mirror stem using the appropriate hardware
- Double-check all connection points before proceeding
- Test the mount's stability by applying moderate pressure in various directions
Step 3—Balance and secure your camera
With the base installed securely, it’s time to attach the camera:
- Attach the camera to the mount using a tripod screw or quick-release connection
- Balance the camera's weight as evenly as possible to limit stress on the mount
- Position the camera for the desired framing while avoiding visibility issues for the driver
- Secure all articulation points firmly to prevent camera slippage during driving
- Attach safety tethers to the camera, as applicable, to prevent damage if the primary mount fails
Step 4 — Test for stability
Avoid any behind-the-wheel surprises by testing the camera mount before the action begins:
- Take a short test drive that includes acceleration bursts and cornering to identify potential issues
- Review test footage to identify vibration or movement issues
- Make necessary adjustments for improved dampening or repositioning
- Perform more advanced road tests, which introduce more demanding conditions if your driving calls for more spirited activities.
Tips for Smooth, Professional Footage
Leverage camera in-body stabilization or lens IS, if available
Modern cameras offer features that help stabilize camera in car footage:
- Activate in-body image stabilization (IBIS) if your camera has this feature.
- Use lenses with optical image stabilization if applicable.
- Adjust stabilization settings to match driving conditions (some cameras have specific stabilization modes for vehicle use)
- Record at higher frame rates (60 or 120 fps) for smoother slow-motion in post-production
Use a wide-angle lens to capture more interior and road
The lens you select has a direct impact on footage quality. Keep these factors in mind:
- Wide-angle lenses (16-35 mm range) capture more of the interior and the road and minimize the appearance of camera shake.
- Consider lens weight in determining the full weight of a mounted camera.
- Fixed focal length (prime) lenses are often lighter than zoom lenses.
- Set a moderate aperture (f/5.6-f/8) to maintain focus across the scene (the wider the aperture, the greater the depth of field).
Keep cables and straps tidy
Neatness and precision complete the perfect camera installation:
- Route all cables away from the vehicle controls and cockpit area to avoid driver interference.
- Use tape or cable ties to secure all wiring and prevent movement.
- Double-check that all components and cables are tight to minimize unwanted noise or visual distractions.
- Position the microphone away from air vents or other undesirable noise sources.
- Mark your preferred camera position (or take detailed pictures) for consistent future use, especially if the camera won’t be used in the same vehicle regularly.
Ready to Roll
Successfully capturing driving from a track day or other notable outings starts with a quality camera mount. It doesn’t matter how good the camera is if it can’t record high-quality footage. This is an important consideration with DSLRs and mirrorless cameras, which are heavier than action cameras.
SUPERMOUNTS is the ideal solution, as these clever platforms are engineered to handle bulkier cameras and other devices. Best of all, each SUPERMOUNTS system is designed for a vehicle-specific installation that provides a factory look. Vehicle compatibility includes select models from Acura, Audi, Chevrolet, Ford, Honda, Hyundai, Infiniti, Lamborghini, Lexus, Mazda, Nissan, Porsche, Subaru, Toyota, and other brands.
Learn how SUPERMOUNTS can transform your driving adventure. Explore the RoadSpy store or contact RoadSpy customer support for personalized assistance.